How to Integrate Cloudflare R2 with Next.js 15 and Deploy on Vercel from GitHub (2025 Guide)
Quick TL;DR##
- Create R2 bucket + access keys in Cloudflare.
- Add keys to Vercel environment variables.
- Make a server API route in Next.js that creates a presigned PUT URL (using AWS S3 SDK).
- Upload from the browser with the presigned URL.
- Push to GitHub → connect to Vercel → deploy.
Short, no fluff — you’ll be done in minutes.
Why R2 is better than S3 (beginner-friendly)##
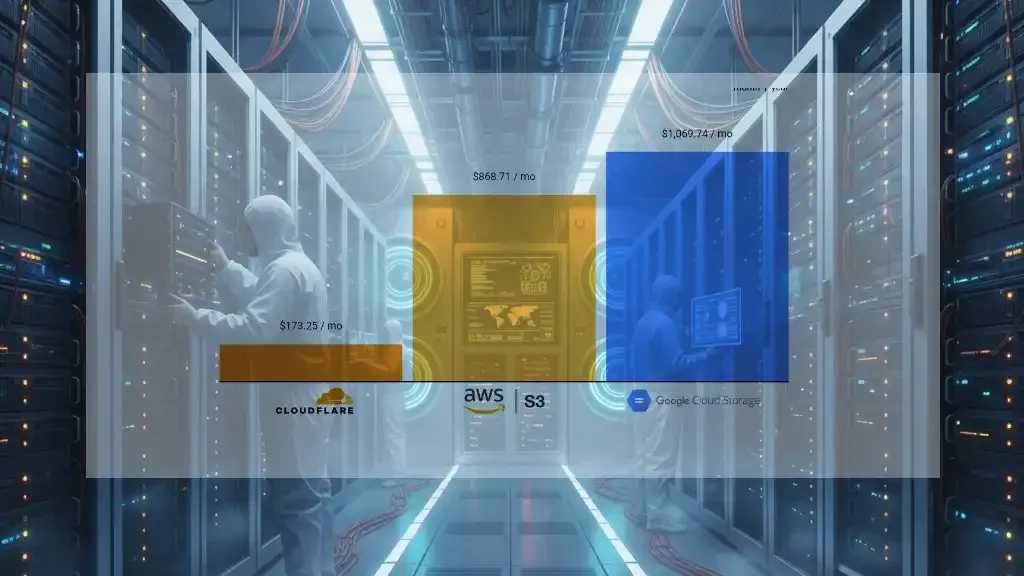
- **Cheaper/no egress to Cloudflare CDN** — R2 avoids heavy egress costs when paired with Cloudflare’s edge.
- **S3-compatible API** — you can use the same AWS SDK code with a custom endpoint.
- **Simple pricing** for static object storage — ideal for uploads & static assets.
- **Global edge delivery** with Cloudflare built-in.
Downside: S3 still has deeper enterprise features. But for cost + performance, R2 wins for most web apps.
Step-by-step guide##
1) Create R2 bucket + Access Keys##
- Go to Cloudflare Dashboard → **Workers & R2** → **Create bucket**.
- Find your **Account ID** (needed for endpoint).
- Create **Access Key** (Access Key ID + Secret). Save both.
2) Add environment variables in Vercel##
R2_ACCOUNT_ID=your_account_id
R2_BUCKET=your_bucket_name
R2_ACCESS_KEY_ID=your_access_key
R2_SECRET_ACCESS_KEY=your_secret
R2_REGION=auto
3) Install AWS SDK in your Next.js app##
npm install @aws-sdk/client-s3 @aws-sdk/s3-request-presigner
4) Create a server API route for presigned URL##
Copy
```
// app/api/upload-url/route.ts import { NextResponse } from “next/server”; import { S3Client, PutObjectCommand } from “@aws-sdk/client-s3”; import { getSignedUrl } from “@aws-sdk/s3-request-presigner”;
const s3 = new S3Client({
region: process.env.R2_REGION || “auto”,
endpoint: https://${process.env.R2_ACCOUNT_ID}.r2.cloudflarestorage.com,
credentials: {
accessKeyId: process.env.R2_ACCESS_KEY_ID || “”,
secretAccessKey: process.env.R2_SECRET_ACCESS_KEY || “”,
},
});
export async function POST(req: Request) {
try {
const { name, type } = await req.json();
const key = uploads/${Date.now()}-${Math.random().toString(36).slice(2,8)}-${name};
const cmd = new PutObjectCommand({
  Bucket: process.env.R2_BUCKET,
  Key: key,
  ContentType: type,
});

const url = await getSignedUrl(s3, cmd, { expiresIn: 60 });

return NextResponse.json({ url, key });
} catch (e: any) { return NextResponse.json({ error: e.message }, { status: 500 }); } }
  ## 5) Upload from client##

    Copy
    ```

async function uploadFile(file) {
  const res = await fetch("/api/upload-url", {
    method: "POST",
    headers: { "Content-Type": "application/json" },
    body: JSON.stringify({ name: file.name, type: file.type })
  });
  const { url, key } = await res.json();

  await fetch(url, {
    method: "PUT",
    headers: { "Content-Type": file.type },
    body: file
  });

  return { key, url };
}
6) Deploy on Vercel##
- Push code to GitHub.
- Import repo into Vercel.
- Add same env vars in Vercel settings.
- Deploy — done!
Final Checklist##
- [ ] R2 bucket + Access Key created
- [ ] Env vars in Vercel
- [ ] Presigned URL route added
- [ ] Client upload function works
- [ ] GitHub → Vercel connected
End note: I personally run my site on R2 — it saves cost, gives me Cloudflare’s CDN edge, and still lets me use familiar S3 code. For most devs, it’s the best combo of speed + budget.